HTML Native Validation
- 브라우저에서 지원하는, html 에 쓰는 !
- input-type, require, min, max, length
- 퍼포먼스가 좋다 → 즉각적인 반응!
- 커스텀이 힘들고 제한적 → 복잡한 동작 불가능
basic
<form action="">
	<label for="stuff">원하는 수량을 입력하세요 : </label>
	<input id="stuff" type="number" min="3" max="10">

	<label for="stuff2">이메일을 입력하세요 :</label>
	<input id="stuff2" type="email" required minlength="10" maxlength="20">
	<button type="submit">제출</button>
</form>
- type : input 타입
- min, max : number 최소값, 최대값 지정
- minlength, maxlength : 문자 최소, 최소 길이 지정
- required : 필수 입력
validation 가상선택요소로 스타일 주기
- required 일 때
input:required {
	border: 3px solid green;
}
- 올바르지 못한 입력을 받았을 때
input:invalid {
	border: 3px solid red;
}
- 값이 올바를 때
input:valid {
	border: 3px solid blue;
}
- 중첩 사용
input:required:invalid {
	background-color: hotpink;
}
pattern - 정규표현식
<label for="">사과를 입력하세요</label>
<input type="text" pattern="사과">

<label for="">사과와 배 중 하나를 입력하세요</label>
<input type="text" pattern="사과|배">

<label for="">모든 문자(숫자+글자)중에 세글자만 입력하세요</label>
<input type="text" pattern="...">

<label for="">첫번째 문자는 사, 과, 배, 두번째 문자는 1, 2, 3만 입력가능합니다.</label>
<input type="text" pattern="[사,과,배][1-3]">

<label for="">한글만 입력가능합니다.</label>
<input type="text" pattern="[ㄱ-ㅎㅏ-ㅣ가-힣]">

<label for="">한글,숫자 글자수 제한 없이 입력가능합니다.</label>
<input type="text" pattern="[ㄱ-ㅎㅏ-ㅣ가-힣0-9]*">

<label for="">한글,숫자 한글자-다섯글자만 입력가능합니다.</label>
<input type="text" pattern="[ㄱ-ㅎㅏ-ㅣ가-힣0-9]{1-5}">

<label for="">한글,숫자 다섯글자 이상 입력가능합니다.</label>
<input type="text" pattern="[ㄱ-ㅎㅏ-ㅣ가-힣0-9]{5,}">

<label for="">주민등록 번호를 입력해주세요.</label>
<input type="text" pattern="[0-9]{13}">

<label for="">이메일 주소를 입력해주세요.</label>
<input type="email" pattern="[a-zA-Z0-9]*@[a-z]*\\.[a-z]*">
JS Validation
- 다양한 커스터마이징 가능
- html 보다는 느리다 → 사용자가 체감할 정도는 아니다
- validation 라이브러리는 다양하고 많다.
Client-side form validation - Learn web development | MDN
Client-side form validation - Learn web development | MDN
Client-side form validation sometimes requires JavaScript if you want to customize styling and error messages, but it always requires you to think carefully about the user. Always remember to help your users correct the data they provide. To that end, be s
developer.mozilla.org
JS Validity 확인하기
<form action="">
 <input type="email" required>
</form>
const inp = document.querySelector('input');
inp.addEventListener('input', () => {
 console.log(inp.validity);
})
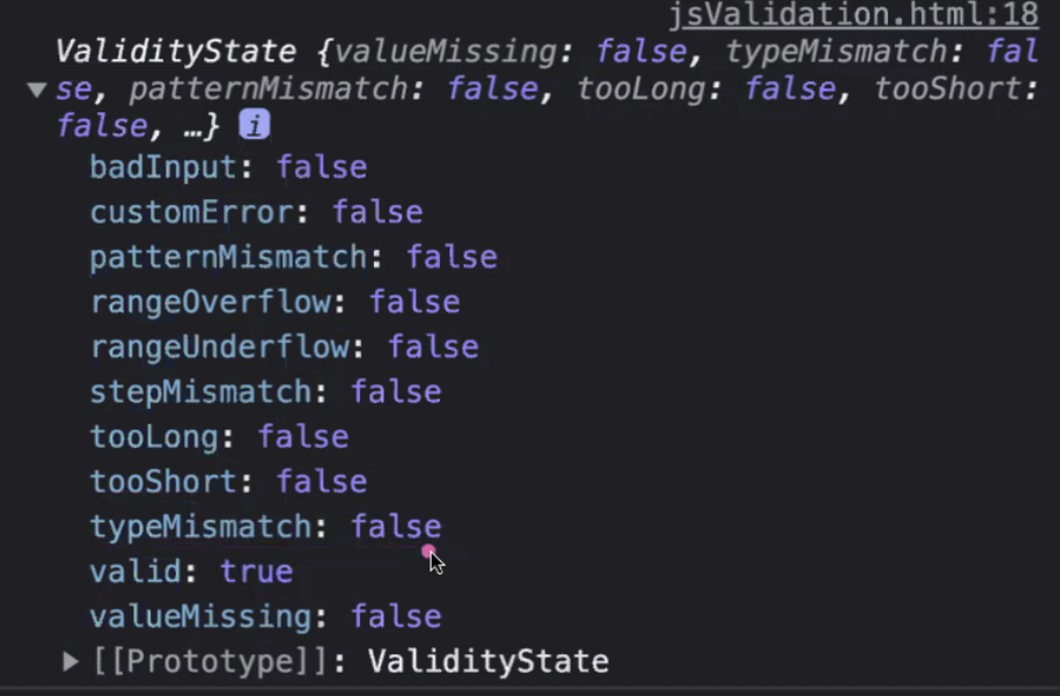
- typeMismatch : input 타입이 맞는지 확인
- patternMismatch : pattern 조건 확인
- rangeOverflow, rangeUnderflow : max, min 조건 확인
- tooLong, tooShort : maxlength, minlength 조건 확인
- vaild : 모든 유효성을 통과 했는가 → 이게 true가 되면 통과!
// 모든 요소 적용하기
const inps = document.querySelectorAll('input');
inps.forEach((inp) => {
	inp.addEventListener('input', () => {
		console.log(inp.validity);
	})
})
Custom Validity
HTMLObjectElement: setCustomValidity() method - Web APIs | MDN
HTMLObjectElement: setCustomValidity() method - Web APIs | MDN
The setCustomValidity() method of the HTMLObjectElement interface sets a custom validity message for the element.
developer.mozilla.org
- 알림 메세지 변경하기
const inp = document.querySelector('input');
inp.setCustomValidity('입력이 아무래도 뭔가 이상한 느낌이 들어요');
⇒ 하지만 제출이 되지 않는다 !
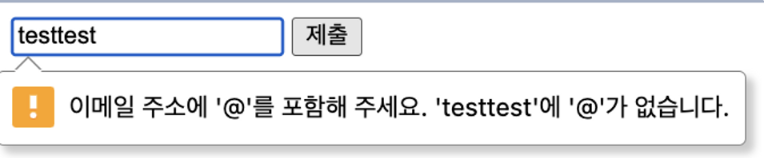
- 알림 메세지 분기처리로 해결
const btn = document.querySelector('button');
const inp = document.querySelector('input');
btn.addEventListener('click', () => {
	if (inp.validity.typeMismatch) {
		inp.setCustomValidity('알맞은 양식의 이메일 주소를 입력하세요!');
	} else {
		inp.setCustomValidity('');
	}
})
- 전체 input 요소에 적용하기
const btn = document.querySelector('button');
const inps = document.querySelectorAll('input');
btn.addEventListener('click', () => {
	inps.forEach((inp) => {
		validate(inp);
	})
})

function validate(target) {
	if (target.validity.valueMissing) {
		target.setCustomValidity('값이 없습니다. 정신 차리자');
	} else if (target.validity.typeMismatch) {
		target.setCustomValidity('알맞은 양식의 데이터를 입력하세요!');
	} else {
		target.setCustomValidity('');
	}
}
회고
프로젝트 시작전 form validation에 대해 다시 짚어가는 시간을 가졌다. 마침 HTML/CSS 정규 수업때 놓친게 많은 부분이었는데 추가적인 기능까지 알 수 있어 정말 유익했다. DOM 쓰는게 능숙하지 않아서 JS 커스텀 배운다고 할 때 겁먹었는데 생각보다 간단해서 이해하기 쉬웠다. 이 코드들은 두고두고 많이 활용될 것 같다ㅎ-ㅎ
'Frontend > HTML-CSS' 카테고리의 다른 글
| [jQuery | 제이쿼리] jQuery 사용하기 - 선택자, 필터 (0) | 2023.05.01 |
|---|---|
| [CSS] Sprite 기법, 반응형 컨텐츠 만들기(ft. img, video, iframe) (0) | 2023.04.06 |